Picture
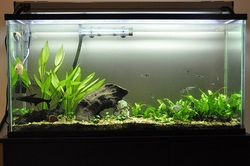
An aquarium can be a wonderful addition to your house. But they do need to be looked after so you can maintain a clean and healthy appearance. Not only will guests appreciate its cleanliness – your fish will thank you, too! Most people will recommend doing a 15-25% water change every week, but every now and then you should also do a complete water change and more thorough clean. Let’s look at some tips for going about this.

  • Empty out the fish. Take the fish out and place them in a suitable bowl or bucket, make sure it does not have any remnants of detergents in it, and if you have tropical fish, ensure the water has reached the correct temperature before you move the fish in. Place a board over the top of the bucket to stop the fish from jumping out. 
  • Empty the tank. Remove any plants you have carefully so that you don’t damage them. Take out ornaments and put them in a bucket of very hot water to soak, unless this may damage them. Scoop out the stones or sand at the base of the tank, and then remove the water by bailing or siphoning it away.
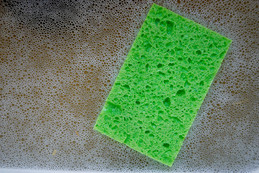
  • Clean everything. Do not use detergent at any point as detergent will be hard to wash away completely (which would in turn damage the fish). Clean the inside of the tank with hot water and a sponge, don’t use anything abrasive as you will scratch the inside of the glass. Rinse the plants gently, throw away any leaves that are damaged, and gently rub algae off the leaves if it is there. Use a sieve and very hot water the clean all the sand or pebbles that cover the base of the tank. Clean ornaments with a toothbrush to get all the algae and dirt off them. 
  • Put it all back. Fill half the tank with water and add the bottom pebbles of sand back in. Arrange the plants and ornaments as you choose, and then fill the rest of the tank up, trying to get the temperature as near as possible to the right one for your fish. Add water-balancing chemicals if you need to, and then put the fish back in gently. The sooner you finish the process, the less stress you put on the fish.

The last thing you want is a dirty tank. Performing a very thorough cleaning every now and then (in addition to weekly partial water changes and cleanings) will ensure that your fish have a comfortable environment to live in.

~ Jenny :)

 
Picture
Hardwood floors are a beautiful part of the home, but many of us are unsure how to clean them without damaging the finish. Hardwood flooring, after all, is delicate and really should be handled with care. So let’s take a look at how to rightly maintain and clean your floors so that they can stay beautiful for years and years to come. All it takes is a little know-how and some precautions here and there. :)

Prevent Damage in The First Place

Cleaning isn’t the only thing that can damage those floors. There are a number of other precautions to keep in mind as well. Avoid walking on the floors in heavy or heeled shoes. Lay rugs in areas of high traffic. Try placing mats at the entrance and exit of rooms to avoid outdoor mud from being tracked into the house. Keep your pets’ claws short to avoid scratches, and always lift furniture (don’t drag) when moving. You can even buy pads for the feet of furniture to prevent them from denting or scratching the floor. When waxing or staining, always follow the manufacturer’s advice. And whenever you have  a spill, clean up immediately, as liquids can warp and stain the flooring.

Clean Carefully

Most hardwood floors will just need a little sweeping or vacuuming once or twice a week. Of course, if you have pets that shed, this may need to be done more often. When sweeping, be sure to use a brush with soft bristles to avoid scratching. When vacuuming, turn off the beater bar (if it has one) because otherwise it can damage wooden flooring with dents. A damp (not wet – remember, water warps!) mop can be used to clean the floors when they get dirty, but any excess water must be cleaned up right away or the floor will warp. If the floor has become greasy and a damp mop isn’t doing the job, try adding a little vinegar to the water; this will cut right through grease and mildew and will not damage your floor. If the floor seal is not damaged, then most spills will wipe up with a kitchen towel as long as they are dealt with immediately. Only use manufacturer-recommended products for polishing, and remember that polished floors can become very slippery, so be sure to warn others.

Hardwood floors are a popular choice of flooring in many homes. And with a little knowledge on what to do and not do, they are relatively simple to clean. Clean regularly and avoid damage and then you’ll have a lovely floor for many years to come. 

~ Jenny

 
Picture
Have you noticed lately that your kitchen sponge needs some cleaning? Or maybe you’ve just cleaned a large mess in your kitchen and are pondering if you should simply toss it for a new one. Or should you try to clean it instead? The truth is that you don’t need to throw it away. You can get lots of great use out of your sponges and still have the peace of mind that it’s clean. Let’s take a look at a few simple methods for cleaning the kitchen sponge. You’ll want to perform one of the following at least once every 3 or 4 days.

  • If you have a metal-free sponge, you can use the microwave to banish germs. Saturate your sponge completely. Place it on a paper towel in the microwave alongside a glass of water (this protects the microwave emitter). By setting the microwave for two minutes, you can kill up to 99% of germs present on your sponge, along with bacteria, mold, and yeast.  Remove the sponge and let it cool completely before attempting to use it again.
  • Another simple way to clean your sponge is by soaking it in a mixture of ½ cup vinegar, 3 tablespoons salt, and 1 cup of hot water overnight. The next day, squeeze it, and then allow it to dry. Viola! Your sponge is clean and ready to be used again.
  • You can also just throw your sponge into the dishwasher and allow it to remain through the entire wash and dry cycle. How simple is that?
  • You might also use a solution of 10% bleach on your sponge after cleaning it with regular dish detergent and hot water. Soak the sponge for 5-10 minutes. Squeeze it a few times during the process to really let the cleaning solution soak in (you may want to be wearing gloves to protect your skin). Then rinse the sponge thoroughly in hot water after removing it from the bleach solution.

While these are effective solutions for keeping your sponges clean, you should still replace your sponges every now and then - no matter what you use them for or how often you clean them. Still, by cleaning your sponges on a regular basis (every 3 to 4 days), you can help prevent the spread of mold, yeast, bacteria, and germs and maintain a clean kitchen and home for you and your family.

~ Jenny

 
Picture
CleverCleaningTip#2: Try keeping an open box of baking soda in the fridge to keep it smelling fresh and clean. OR! Try some other alternatives. Oats, coffee grinds, and vinegar can all be used to absorb bad smells. Pick one, spread on a baking sheet or pour in a bowl and then leave it there for a couple days to get that fresh smell back.

CleverCleaningTip#3: Use Cola as a cheap (yet very effective) toilet bowl cleaner. Both generic and brand name cola products are equally effective. All you have to do is pour in a can's worth of cola, leave it for an hour, scrub it, and then flush! No need for commercial cleaners here.

CleverCleaningTip#4: Got ink stains? No problem. Get those pesky stains out of your clothes by giving them an overnight milk bath. You only need enough milk to keep the stain submerged. Then wash like normal the next day and you should be ink-free.

 
Picture
I'm so happy to announce my first guest post! Thanks so much to Ashley Phipps at Simply Designing for hosting me. Especially as I am still in the early stages of getting my own blog going, it is a real honor to be featured on such a nice site. So be sure to check out what I put together! It's some of my favorite advice for getting yourself in the spring-cleaning mood. Especially now that spring is so close and many of us are starting to think about that big clean! So take a look! Here at 7 Tips for Getting in the spring-Clean Spirit. :)

 
Picture
photo credit: Horia Varlan
Kitchen sponges are some of the dirtiest things in your house. In fact, many contain dangerous bacteria like salmonella and e-coli. So how can you clean them? Just throw them in hot and soapy water, put them in the microwave for 2 minutes, and you'll kill 99.9% of the germs. Easy!

 
Hello to everyone! I am finally taking the time to start putting together my blog and I could not be more excited! I have all kinds of clever tips that I can't wait to share with you. I hope you'll check back regularly!